Creating an authenticated preview site for Gatsby and Contentful using Netlify Identity
April 21, 2019
Learn how to setup a preview instance of your Gatsby site using the Contentful Preview API and authenticate it using Netlify Identity with Google OAuth.
Introduction
Contentful provides a Preview API that returns unpublished content (e.g. draft blog posts) to allow users to preview this content on their website.
Setting up a server to host an instance of your Gatsby website that uses the Preview API and is accessible within a local/corporate network is relatively trivial. In my case, I am working with a remote content creator; we do not work on the same network nor do I have a dedicated local network available for VPN access. Gatsby provides tutorials on authenticating routes but in this case I want the entire website to be authenticated without having to re-create page routes.
The solution I came up with is to run a preview instance on Netlify that uses Netlify Identity for authentication and Netlify Deploy Contexts to ensure that the builds on a target branch use the Preview API and turn on authentication. Contentful Webhooks are used to trigger re-deploys on Netlify to ensure the preview website stays updated.
To summarize the changes:
-
Wrap Gatsby's root element in a higher-order component that uses Netlify Identity to check if the user is logged in
- If the user isn't logged in, redirect to a login screen
- Add support for environment variables to force builds to use the Contentful Preview API
- Create a deploy context on Netlify for the target branch (e.g.
developorpreview) that sets environment variables - Add a webhook to Contentful to trigger re-deploys for the target branch deploy context
Prerequisites
This post will not cover how to set this up from scratch.
There are some prerequisites:
-
Gatsby + Contentful project
- I recommend using the starter
- Netlify site linked to the project
There are plenty of good resources online (1, 2) you can use to learn how to set this up.
Setup
Gatsby
We can create a wrapper service for netlify-identity-widget that our application can use to check if the user is authenticated and allow the user to login.
First, install it as a dependency via npm i -S netlify-identity-widget.
auth.js:
import netlifyIdentity from 'netlify-identity-widget';

// `window` won't be defined on SSR builds
if (typeof window !== 'undefined') {
  netlifyIdentity.init();
  window.netlifyIdentity = netlifyIdentity;
}

export default {
  isAuthenticated: false,
  authenticate(callback) {
    this.isAuthenticated = true;
    netlifyIdentity.open();
    netlifyIdentity.on('login', user => callback(user));
  },
  currentUser() {
    return netlifyIdentity.currentUser();
  },
};
Next, we create a higher-order component that we can use to wrap page components.
withAuth.js:
import React, { PureComponent } from 'react';

import auth from './auth';

// We can check this before the component is rendered.
const alreadyLoggedIn = auth.isAuthenticated
|| auth.currentUser() !== null;

export default function withAuth(PageComponent) {
  return class WithAuthPageComponent extends PureComponent {
    state = {
      isLoggedIn: false,
      redirectPath: null,
    };

    componentDidMount() {
      // When it's first mounted, store the path name.
      // This allows us to redirect to it after the user has logged in.
      const path = window.location.pathname;
      this.setState({
        redirectPath: !alreadyLoggedIn && path !== '/'
          ? path
          : null,
      });
    }

    login = () => auth.authenticate((user) => {
      if (user) {
        this.setState({
          isLoggedIn: true,
        });
      }
    });

    render() {
      const {
        isLoggedIn,
        redirectPath,
      } = this.state;

      if (!isLoggedIn && !alreadyLoggedIn) {
        return (
          <button
            type="button"
            onClick={this.login}
            // This will center the button vertically
            // and horizontally. You don't need to do this necessarily.
            style={{
              left: '50%',
              top: '50%',
              transform: 'translate(-50%, -50%)',
            }}
          >
            LOGIN
          </button>
        );
      }

      if (redirectPath) {
        window.location.replace(redirectPath);
        return null;
      }

      return (
        <PageComponent {...this.props} />
      );
    }
  };
}
Now, we can create the function to do the wrapping (based on an environment variable -- we'll cover that after).
wrapRootElementWithAuth.js:
import React from 'react';
import PropTypes from 'prop-types';

import withAuth from './withAuth';

const useAuth = process.env.ENABLE_NETLIFY_AUTH === 'true';

const wrapRootElement = ({
  element,
}) => {
  const RootElement = () => (
    <React.Fragment>
      {element}
    </React.Fragment>
  );

  if (!useAuth) {
    return <RootElement />;
  }

  const ElementWithAuth = withAuth(RootElement);
  return <ElementWithAuth />;
};

wrapRootElement.propTypes = {
  element: PropTypes.node.isRequired,
};

export default wrapRootElement;
Now, we need to do the element wrapping via Gatsby's Browser APIs and Node APIs. We can use wrapRootElement specifically.
gatsby-browser.js:
import wrapRootElementWithAuth from './src/auth/wrapRootElementWithAuth';

export const wrapRootElement = wrapRootElementWithAuth;gatsby-node.js:
import wrapRootElementWithAuth from './src/auth/wrapRootElementWithAuth';

export const wrapRootElement = wrapRootElementWithAuth;
Now, we need to add support for ENABLE_NETLIFY_AUTH. Since we're using it on the client-side, we need to make it accessible to
modules. This can be accomplished with gatsby-plugin-env-variables.
After installing it as a dependency (npm i -S gatsby-plugin-env-variables), add the following lines to your gatsby-config.js file:
...
plugins: [{
  resolve: 'gatsby-plugin-env-variables',
  options: {
    // Variables in the whitelist will be available to builds as process.env.<NAME>, just
    // like Node processes
    whitelist: [
      'ENABLE_NETLIFY_AUTH',
    ],
  },
}],
...
Now, we must add environment variable support to switch to the Contentful Preview API.
Let's name this variable CONTENTFUL_USE_PREVIEW.
With gatsby-source-contentful, there is a host option we can use. I moved plugin options to their own module for encapsulation.
NOTE: You will need both Preview and Delivery API tokens setup in your build environment.
contentful-options.js:
// We can use dotenv to read environment variables from a file (e.g. local environment).
// This is not required if you don't want to preview locally.
// This does require you to install it as a dependency:
//  `npm i -S dotenv`
require('dotenv').config({
  path: '.env',
});

const {
  CONTENTFUL_SPACE_ID: spaceId,
  CONTENTFUL_USE_PREVIEW,
} = process.env;
const usePreview = CONTENTFUL_USE_PREVIEW === 'true';

const host = usePreview
  ? 'preview.contentful.com'
  // If `null`, defaults to the Delivery API
  : null;
const accessToken = usePreview
  // The Preview API uses a different token than the Delivery API
  ? process.env.CONTENTFUL_PREVIEW_TOKEN
  : process.env.CONTENTFUL_DELIVERY_TOKEN;

if (!spaceId || !accessToken) {
  throw new Error(
    'Contentful spaceId and access token need to be provided',
  );
}

module.exports = {
  spaceId,
  host,
  accessToken,
};
Then, pass them to the plugin as options:
gatsby-config.js:
const contentfulOptions = require('./contentful-options');

...
plugins: [{
  resolve: 'gatsby-source-contentful',
  options: contentfulOptions
}],
...
Netlify
Now, we need to setup Netlify to support authenticated builds using the Preview API.
-
Add the following environment variables:
CONTENTFUL_PREVIEW_TOKEN- Contentful API token
-
Add a deploy context (
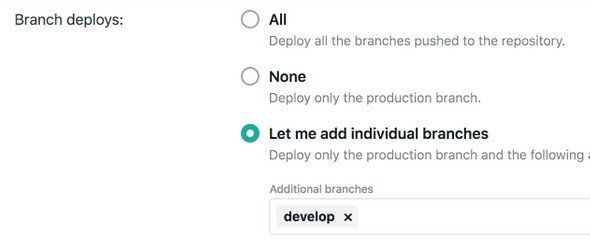
Site settings > Build & deploy > Deploy Contexts) for the target branch, e.g.develop -
Update your build settings via
netlify.tomlto use authentication and the preview APInetlify.toml:# Settings for `develop` branch deploys. # If your target branch is named something else, # the context will be "context.<NAME>.environment". [context.develop.environment] CONTENTFUL_USE_PREVIEW = "true" ENABLE_NETLIFY_AUTH = "true" -
Enable Identity, add Google as a provider, and set it to invite-only
-
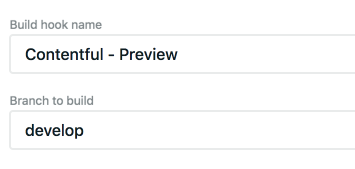
Finally, add a build hook for the
developdeploy context and copy it to your clipboard
Contentful
Finally, we need to setup Contentful to trigger re-deploys of develop when content changes.
Open the Webhooks for your environment and add the copied build hook.
We can add linking from content to the preview website:
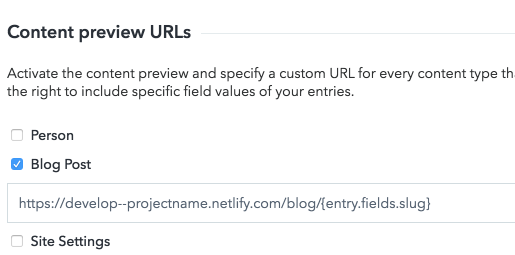
-
Open
Content Previewfor your environment -
Select the content you want
-
Use the full Netlify URL for the preview URLs
- e.g.
https://develop--projectname.netlify.com/blog/{entry.fields.slug}
- e.g.
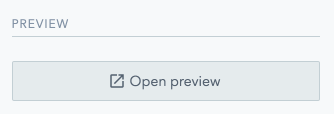
Then, a preview button will show up for creators on the right-side pane when creating content such as blog posts.
Testing
To test the setup, push the changes to the develop branch after configuring Contentful and Netlify. Upon a successful deploy, you should be redirected to the login page when accessing the website.
Conclusion
Questions? E-mail me.


